Showing posts with label First Birthday. Show all posts

Thursday, June 19, 2014

{First Birthday} Under the Sea: Games and Decor

Well here we are at the last first birthday post! The blogger in me is happy that I finally finished these posts, but the mommy side is sad that they are over and I will now be starting his toddler monthly updates! The really sad part is that in real life he is already 22 months and that close to being TWO! It's kind of nice being so far behind because I get to reminisce a lot; smile and laugh over how cute and goofy he was. But alas, it is time to put the first birthday in the books. Before I start though, if you happened to miss any of the other first birthday fun check it all out here: 
 
Now that you are all caught up, let's get to the Under the Sea party decor and games:

DECORATIONS


 These are the welcome signs we made for the party. The 'Happy to Sea U. Clam On In" sign was in the front yard. My mom painted the sand and water on a piece of cardboard and then stenciled some sea creatures and shells. I hot glue gunned some real shells onto the board and my brother's friend wrote the saying. The other sign was hanging from a trellis arch at the backyard entrance. We made this one basically the same way as the other. I added some shells, foam stickers, and animal stencils. I also used pipe cleaners for a little more flare.
Here is a bigger view of the sign and a couple other DIYs we did for decor. We used the screened-in porch to house all of the food, favors, etc., so we added some sea themed items back there too. I tried to make some jelly fish from paper lanterns, but they didn't turn out as I had wished. I just added some streamers to the inside of the bottom of the lanterns. I crinkled the streamers in hopes it would give them more 'movement', but they didn't stay that way. I still liked them, but I am not sure that they really looked like jellyfish. We also added a DIY anchor. My mom strung a fishing net onto the wall and then attached an anchor she made from cutting out cardboard and painting.

On the outside of the porch, I hung the picture banner that I made. The hardest part of this DIY was deciding on just 3 pictures to use for each month. I had to go through and organize all the pictures I had taken for the past year! After I had all the pictures printed, I put the actual banner together. First, I cut out the fish shapes, four of each color (teal, green, and orange), from scrapbook paper. Then I laid out the fish in the arrangement I wanted them to hang. I wrote each month on the fish (newborn-11 months) and then hole punched each fish and picture. The top two pictures I hole punched both the top and bottom of the picture. I tied the pictures together with twine and then to the fish that corresponded to the month of the pictures. Lastly, I taped the fish onto a long piece of the twine.
My step-dad hung the banner with nails to the roof of the porch. This project took the most time, but it was my favorite part of the whole party.

A peek into the porch: you can see all the details in the Food and Favors post.

I already posted about our shark attack photo booth, but now I wanted to talk about how it was made. I got the inspiration from this picture I found on Pinterest and then I passed the dirty work off onto my family. They put their own spin on the idea and made it before we got into town. It was cut out of one huge piece of cardboard and then painted. They also added an extra set of teeth on the bottom. When I got there, I added the water/waves and streamers. I also made the sign for the photo booth. It is just a piece of cardboard that was folded and stuck in the ground with a stake. I wrote on it and then added some stickers and stencil cut-outs. This was my other favorite part of the party. I love the way it turned out. I don't know how I am going to top it for his second birthday.

GAMES


We had a lot of younger guests at the party, so I knew I wanted to have some games for them to play. Since it was August and an Under the Sea theme, it was only right for the games to involve lots of water!

I made all of the signs for the games the same way I did the one for the photo booth. 
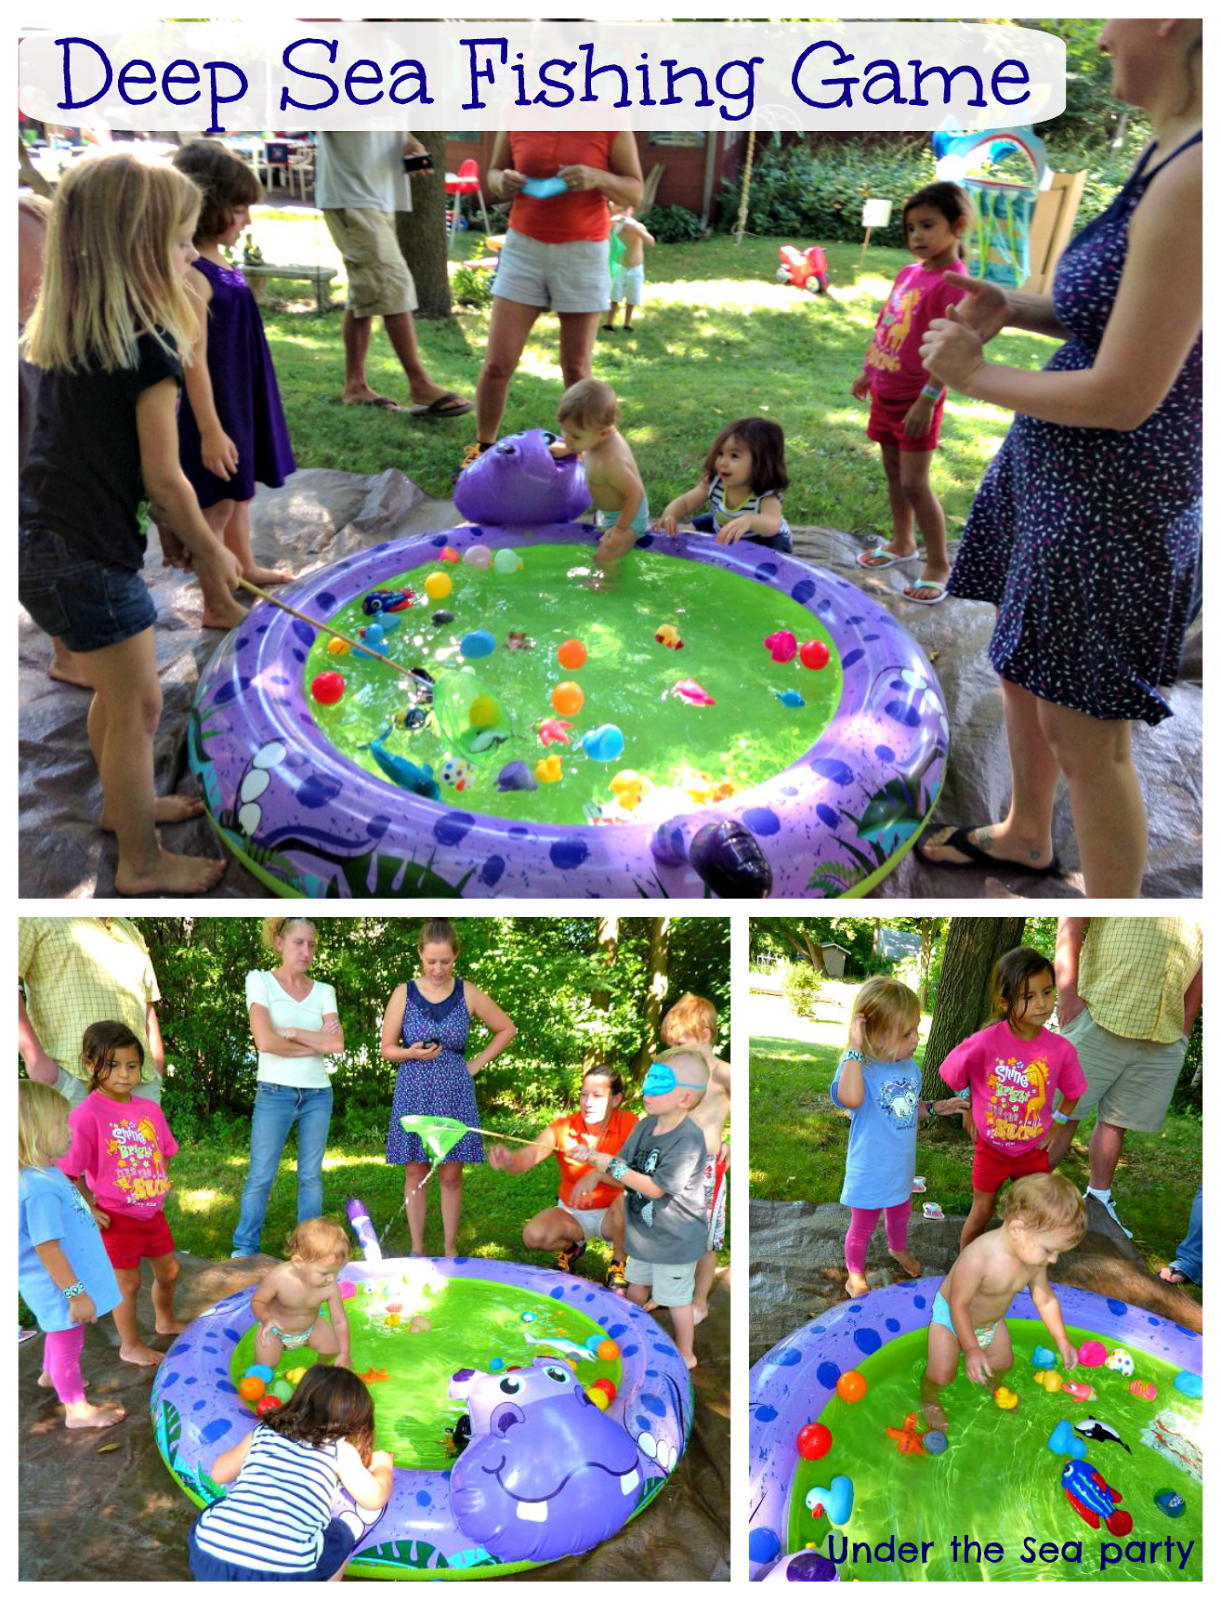
This game we called "Deep Sea Fishing". We filled up Myles' kiddie pool and added tons of floating toys (fish, ducks, balls, etc.). Then, we had each kid put on a blindfold and hold a butterfly net. I used the stopwatch on my phone to time them while they tried to pick up as many toys with the net in 60 seconds. My mom stood next to the kid playing and helped them empty the net when it was full. At the end of 60 seconds, my mom counted up all the toys they got and however many they got was the amount of pieces of candy they got to pick out to put in their sand bucket favor holders. 
Here are some shots of everyone playing. Myles just got into the pool and played with all the toys! The older kids did really well with this game though; a couple of them got almost all of the toys out in the 60 seconds! It worked way better than what I thought it was going to.

The next game we played I named "Ocean Sand Treasure Hunt". My mom got this box from her work and we just cut it down to size. We added tons of sand and a bunch of party favor toys, shells, and these metal pieces from my mom's work that look like shark teeth (the top right corner on the sign.) Then we added tons more sand on top of all the 'treasure'. The picture below is to show the stuff we put in the sand (before we added the top sand.) We collected all sorts of shovels and sifters for the kids to use. The plan was to let each kid dig for a certain amount of time, but once they all got over by it, I decided to let them all hunt at the same time. They all got their own space and went at it. It worked out well because all the kids were nice and not pushy or anything. Whatever they found they were able to keep and put in their sand bucket favor holders. *I didn't think of this at the time, but it would have been a good idea to get a water bucket or hose to wash off all the treasure they found before putting it in their buckets.*

There was just enough room for every kid to get a spot and they all shared very well. My uncle was trying to get Myles to join in, but he didn't really understand what was going on! All of the kids really loved this one too.

The other game that was planned to be played (I made the sign and everything), was the "Crab Walk Relay". We ended up not getting around to playing it though. The kids were having so much fun playing with the water forts (see below), so we decided to just forgo that game and let them be. The plan was to have teams (kids and adults mixed) do the crab walk from one end of the yard to the other, relay style.

We saved the messiest and most fun game for last! My mom and I had an idea to do a water fight, but we wanted to make it a little more exciting for the kids. So we came up with the idea to make these forts. This was the last project we were trying to finish right before the party and we ran out of time to really finish them, but they turned out well enough for the kids to have fun! They are just folded cardboard that got painted, stenciled, and adorned with some 'coral'. My mom had the idea to use a couch cushion to make the coral at the bottom of the 'Great Barrier Reef'. My brother and his friend we in charge of this project. She tore up the cushion into small pieces, spray painted them, and then glued them to the cardboard. The only thing we didn't get to was painting the animal stencils. You can kind of see the black outlines of them in the pictures. Time just got away from us and really they were just going to get wet and mostly likely destroyed anyway.

Once we got all the water toys, shooters, and balloons set up, they made teams.. and of course, it was boys against girls! We had two baskets full of balloons and a bucket of water for the squirters and shooters to get filled up.

Surprisingly the balloons lasted a while, which led to the kids having tons of lasting fun! I mean what can top a water fight in the summer?!?

As I finish this last 1st birthday post, I'm getting kind of emotional. The good thing is we will always have these pictures to look back on and we're less than two months away from his second birthday party! I'm hoping it's a good one too, but I'm okay with nothing ever being able to top this one! Although Myles won't remember it, he had the best time and we couldn't be more grateful to all our wonderful family and friends that made this the best first birthday any little boy could ever have!

Thank so much for joining along in my obsessiveness and all your sweet and encouraging comments! 
Do you have any favorite party games? Ones that your kids love or you loved as a child?

Friday, June 13, 2014

{First Birthday} Under the Sea: Food and Favors

Well I finally made it to the party DIY and tutorial post! At the rate I am going these days, I wasn't sure I was going to get done with his first birthday posts before his second one came around! I still have one more post to go, but that one should be out next week and then I will have finished with two months to spare (his birthday is in August). If you happened to miss any of the first birthday fun check it out here: 
 
Now that you are all caught up, let's get to the crafty stuff. I tried to explain things the best I could, but sometimes my writing can get confusing, so if you have any questions, please leave me a comment below. 
Here are all my Under the Sea Birthday Party Theme DIYs and Tutorials:


Birthday Cake

In my most recent first birthday post, I shared Myles eating his cake and opening his presents. I also talked about why I decided to nix the traditional cake and opt for a jello one instead. So the night before the party, I frantically scoured Pinterest to find some sort of inspiration for a jello cake that would go with our Under the Sea theme. I happened upon this pin for sand pudding and poof! the creative side of my brain started working! While searching my mom's storage unit (aka her basement) for party platters and dishes, we found a jello cake mold that had a star cut out on top. See where this is going?... So my idea was to make a beach inspired jello and sand pudding cake! 

How I made it:
I made two packets of blue raspberry jello according to the box. I poured the jello mixture into the mold with the star part put into the top (just an added part of this mold, but not necessary). Fill the mold to about two inches from the top. Let it set for about 30 minutes and then add some fish/sea animal/shark gummies to the jello.
*Two things I learned from doing it wrong: make sure to grease the inside of the mold and prepare this part the night before to let the jello set overnight.* 
 The next morning, when the jello is set, add the sand pudding layer. Put back in the fridge to set until party time.

Sand pudding:
I used this recipe but altered it a bit. Instead of layering it cookie crumble, pudding mixture, and then cookie crumble, I combined the cookie crumble with the pudding mixture. 

Super Simple DIY Cake Bunting

I used this pin to inspire my very first cake bunting DIY and I love the way it turned out.
How I made it:
I picked out two pieces of normal scrapbook paper: one for sand and one for water. I cut them into diamonds and laid them out how I wanted them to be placed on the twine. I folded them in half to make triangles and then wrote out 'Myles' and 'One' in permanent marker. I used a regualr glue stick to attached them to the twine. I just glued the two side of the diamond together with the twine in the middle. I then tied both of the twine buntings onto wooden skewers and placed them into the cake (see cake picture above).

PARTY FAVORS

Gummy Skewers

When I saw these Gummy Skewers on Pinterest, I just knew I had to make them! They are so cute, super easy to make, and a total hit with the kids.
How I made it:
I started out with some wooden skewers and then added the shark gummies and fish gummies (really my aunt did this part and I wrapped and tied them). I used gum drops for the spacers, which worked okay but were a little hard to get through. In the picture I pinned, I think she used gummy lifesavers; obviously a way better idea since there is already a hole in them, but I didn't think of that at the time. I used the left over popcorn bags (see below) to wrap them up and then used twine to tie the bag shut.

Fish Tank Popcorn

Next on my favors list is what I have named "Fish Tank Popcorn Bags". I got the idea from this pin and then just changed it up a bit to suit my theme and colors. 
How I made it:
My cousin made the popcorn portion of this favor. I had never used the chocolate candy melts before and this tutorial wasn't very thorough, so I wasn't really sure what we were getting into. We pretty much just winged it and somehow it turned out amazing... not that you can really go wrong with any sort of combination of chocolate and popcorn! She made these in several small batches to make sure they would turn out okay. First she popped the popcorn using my mother's popcorn machine (microwave should work just fine though). Next, she took a handful of the blue candy melts and heated them up with the microwave. Then she poured the melted chocolate into the popcorn bowl and mixed it up with her hands. Once the popcorn and chocolate have cooled, place into plastic bags and add Swedish Fish. *We learned that it is very important to let the popcorn cool first because otherwise the chocolate is not hardened onto the popcorn and it will smear all over the plastic bag.* 
 I made these tags a couple nights before so they would be ready to be put together once the bags were filled. I bought a pack of circle stickers at Party City in the dessert making aisle. I placed them onto a piece of orange paper (that I had already cut down to size). Then I stamped them with a starfish and wrote "Had a Whale of a Time" on them. I punched a whole in the top, tied them up with some green ribbon, and cut off the extra orange paper. 
These were super yummy and a fun thank-you for all the guests.

Party Favors Table

Here is the table for all of the party favors:
On the far left is different kinds of blue and green candies in the glass jars. The kids were able to pick these out as a prize for one of the games. Next to that are two jars for the gummy skewers. I gave one to each kid in their buckets before they left. In the middle is the fish tank popcorn. These were a thank you/favor for each family to take home as they left. Most were ate during the party as a dessert though, which turned out just fine. And on the right are the sand buckets that each kid got to decorate and take home with all of their goodies inside.


Candies and Food Favors

  Sand Bucket Party Favors

Here is a close up of the buckets we used for the party favors. Each bucket had a 'bigger' favor inside and every child got to pick out which one they wanted and decorate their bucket. We set out a jar of sharpies and a bucket full of marine animal foam stickers that my mom found at Michael's. I just made sure they wrote their names on their bucket and then let them decorate them however they wanted!   

PARTY FOOD

Sand Dollar Cookies

By the time we had planned out all of the food, desserts, and favors, I was pretty sure we had enough and maybe even too much (wait is it possible to have too much food or dessert at a party?), but I seriously could not have an Under the Sea themed party without these Sand Dollar Cookies! Talk about a 'pin-worthy' picture... yum.. I just could not resist these!
How I made it:
 In all actuality my fabulous mother made these! They turned out so stinkin' cute and everyone loved them! I'm pretty sure my mom followed this recipe straight from the site.

Shark Fruit Bowl


How I made it:
My mother made this as well. I think she did a great job, but we laughed that it looked a little more like a monster than a shark! Regardless, the fruit was yummy and the intention was spot on :)

Silverware/Napkin Wraps

These napkin wraps were the first thing I pinned onto my Under the Sea: 1st Birthday board when I officially decided on the theme; and then the craziness ensued from there. I went a little DIY, Pin-spiration wild, but I just had so much I wanted to try out and these were at the top of the list.
How I made it:
These were another DIY that got delegated to the troops. Since this was our first project planned, my mom began wrapping the silverware with the napkins over a month before his party. We were trying to get a head start on the things we knew were going to do. Unfortunately, this ended up being the only thing we got done prior to the week leading up to the party! Anyway, something was better than nothing and it did help to at least have them all wrapped up when my cousin took over the project. She finished them by tying the twine around the napkin, adding the lifesaver mint, and securing it all with a cute little knot!  

Drinks, Snacks, and Sandwiches

We had two drinks at the party: one was iced tea and the other was this Ocean Water Punch (one part Blue Hawaiian Punch, one part lemonade). Obviously, I took this picture before we added the punch, but I wanted to show the sign that I made at least. I just used a food label sign that I made (see below), hole punched the sides, and attached it to the cooler with twine.

I put all of the snacks into these sand castle buckets from the dollar store. I dropped in a shovel and gave each one a food label that I made. I just bought a pack of blank wedding table cards at Michael's and DIYed them to match our theme. I used a crab stamp and on the right and three cute little bubble stamps in the upper left corner. I wish I would have gotten a better picture of them because I was really pleased with how they turn out for a one-minute DIY. 
The snack labels read "Gold Fish" "Sea Shells" "Crunchy Coral" and "Drift Wood".

For the main meal we had submarine sandwiches. I got two cheeses, three meats, and toppings for everyone to make their own sub sandwiches. We also had "Conch Shells and Cheese" for a side that my mother made. I didn't get a picture nor do I remember the recipe, but it was the talk of the party! You can also see the cupcakes on the back table that my aunt made. I showed her these fish cupcakes for the inspiration.

Hope you enjoyed reading and checking out all my DIYs for the food and favors!
Which one was your favorite? Do you prefer to DIY or buy from the store? 
This year I am definitely buying more pre-made than last year!

Thursday, June 5, 2014

{First Birthday} Under the Sea Party: Cake and Presents

As I sit here writing this post about my son's first birthday party, I am watching 'Monster's University' with my now 22 month old son! I'm finding it hard to believe that in 2 months I will have a 2 year old. I just don't know how the last year has gone by so fast. I seriously feel like this birthday was just celebrated and now somehow I am knee deep in DIYing for his second! Planning kids' birthdays are too fun! I loved putting everything together for Myles' Under the Sea 1st birthday and can't wait to share all the details of the party next week! For now I've got some more fun pictures of my little guy enjoying his big day!
And if you missed any of my previous first birthday posts, here they all are:

Cake Time

Having his party after his actual birthday really worked out in my favor when it came to the cake eating. The completely unsuccessful go at the muffin cake eating on his birthday made me realize that a traditional cake at his party was not going to bring about the desired result of the epic first birthday cake showdown! However, I scored big time when I discovered his love for the wiggly stuff: Jello! Good thing was, I hadn't already ordered a cake or anything, so a change of plans just called for some scouring of Pinterest for inspiration. I had a good plan and was excited to see how it would turn out. I didn't have time for a trial, so I just had to put all my trust into my domestic instincts and hope for the best. I'm going to leave you all in suspense and make you come back next week for my party DIYs posts to see how it all turned out. 
He was loving all the attention when we sang to him and then dug right in to the jello! He shoveled fist fulls of the yummy blue stuff into his mouth over and over until he decided he was full. Then his fist fulls of jello began being offered to everyone else. A couple of his cousins, grandparents, mommy, and daddy all got to taste his then destroyed cake.

All was fun and games, until... 

Saturday, May 31, 2014

{First Birthday} Under the Sea Party: Guests and Photo Booth Pictures

I am continuing on with my (maybe a little too excessive amount of) posts detailing Myles' 1st birthday. So far, I wrote about picking a theme and his photo shoot and what we did on his actual birthday. This post is the first of his party. I have tons of pictures that I want to share on my blog for family and friends to see. Because of that, these first couple of party posts are going to be extremely picture heavy and most likely not that exciting to my blog-world readers and friends. I am apologizing in advance for this, but they are important to me and the main purpose of my blog (capturing memories of my son). So please bear with me and I promise I will be getting to the good stuff soon! Cake and presents, games and food, decor and all of the tutorials should be out by next week! But for now enjoy some Myles' cuteness mixed in with family fun!

  When I shared what what we did on his actual birthday, I talked about how we decided to go back to Illinois for Myles' first birthday, even though we had just moved to California 5 weeks before. This was a no-brainer choice for me because I just had to celebrate Myles' first year with all of our family. The long days of traveling was no fun, but it was 110% worth it to be able to celebrate such a meaningful milestone in my life with all my loved ones. Plus, I knew we wouldn't be back until Christmas (4 months away), so I wanted to get everyone together before we would be gone again (for several this time). The party was everything I could have wanted and more. Next to the birth day of Myles, his 1st birthday party was the second best day of my life. It was filled with so much love, joy, and pride for me; it was truly an incredible day. And it was mostly due to the fact that all sides of our families (Mark's family, my dad's side, my mom's side, and my step-dad's side) showed up to support, love, and spend time with my son. It was particularly a very special event because my step-dad's mother, sister, and her family were all in town from Texas and got to meet Myles for the first time.  


 I also have to give a huge shout out to my mother for everything she did to help with this party; I mean one amazing woman right there! Not only her, but tons of other family helped bring everything together and I cannot thank them enough. (When I get to my tutorials and DIYs I will give more details on who did what). 

This post is pictures of all the guests hanging around and then all of our photo booth pictures below that.

My handsome little man!

 My best friend from High School (and beyond) Megan with her little girl McKenna, who is 8 months older than Myles.

 They both loved the balloons the best!
 

Myles and his Uncle Matt

Myles with his cousins Ryann and Aubrey 
(those little girls love him and he just soaks up all the attention)

Top left: Myles' Uncle Matt and cousin Ryann
Top right: Mark's family, including his grandma Nyla
Bottom: More of Mark's family; his mom, sisters, and aunt

Top: My dad and Uncle Mark with my great aunt and daughter
Bottom: My cousin and upgraded aunt to Myles Melissa

Top left: Younger cousins playing on the trampoline
Top right: Megan and McKenna eating :)
Bottom: My best friend from childhood (her kids and husband are around somewhere!)

Top left and right: More of my cousins' kids
Bottom left: My awesome brother and his then girlfriend
Bottom right: My aunts Mary and Sue and Uncle Scott

Overview of all the guests!

If you read my first post where I talked about picking a theme, then you already know I decided to go with Under the Sea. It was so fun coming up with ideas and putting everything together. My mom and I had been planning for months and to see it all come together (with the help of my kind and giving family) was a very proud moment for me. This was the first party I ever threw and I can honestly say I was so happy with how it turned out. I wouldn't have done anything differently and that is saying a lot coming from a super type A, perfectionist! One of the DIY projects my family worked on before we came back was a super awesome shark photo booth! I got the idea from this picture I found on Pinterest and then they put their own little spin on it. I love how it turned out! The teeth are my favorite part! (It will be a part of my tutorial post coming soon.)
Unfortunately, this is right about the time the camera on my phone started acting goofy and would randomly take blurry pictures. So sorry for the quality of some of them (luckily this won't happen this year since I now have my big girl camera)!
 

Photo Booth Pictures:

The Birthday Boy!

Mommy and Daddy with the birthday boy! 
Love his face in the first one.. he was shocked too!

Myles with daddy and his cousin Ryann
Mommy and Myles

Myles with his Uncle Chris (or Unca Tick as Myles calls him)

Of course I had to get in on the fun!

Grandma and Myles
Grandpa and Grandma (with a little creeper Myles)

Left: My cousin Melissa (promoted to Myles' aunt) and her dad Mark
Top right: Myles' great aunt Darla, great-grandma Noreen, and cousin Rheana
Top left: Myles' cousins Ayson, Ryann, and Aubrey


Do you pick themes for your kids' birthday parties? If so, what has been your favorite?